Recipe: Garlic and chilli stuffed mushrooms

  
Until two weeks ago, would you believe it, I didn’t like mushrooms. I wouldn’t refuse point blank to eat them, I wasn’t making a huge scene if one accidentally got on my fork, but if they were easy and inoffensive to pick out of a meal I would. I just didn’t understand how people could like a vegetable roughly the same texture as… in fact the texture isn’t like anything else at all. It is something completely unique. Slimy and rubbery and weirdly ridged and the most disgusting shade of brown imaginable.

Then that fateful night, when I suddenly got the most overwhelming craving for mushrooms. I swear, sometimes I think I’m pregnant with the strange cravings I get out of nowhere. There was the time I decided I couldn’t live if I didn’t have red cabbage for dinner. And then the all-the-time-nothing-but jam sandwiches phase. And now mushrooms.

Maybe I’ve just only ever eaten badly cooked mushrooms. Or overnight my taste buds reconfigured. Or I actually am pregnant. Whatever the reason (definitely not the last one) I now like mushrooms.

Beyond like. I love mushrooms. I actively look forward to eating mushrooms. I plan meals around mushrooms.

And when you’re eating mushrooms every other day you quite quickly run out of ideas for what to do with them. I’d had pasta, stir-frys, all day breakfasts, mushrooms on toast: what else did people make with mushrooms? Why, they stuff them of course.

Usually the kind of person taking the time to stuff a mushroom is someone throwing a dinner party. I can imagine Aunt Petunia slaving away in the kitchen, stuffing mushrooms with goats cheese and thinking how much this is going to impress the Masons (that’s a Harry Potter reference for those of you who’ve been living under a rock for the past 15 years).

I, however, am a long way from being Aunt Petunia in many ways (thank god). Most importantly, for the point that I’m trying to make, I have never in my life thrown a dinner party. Some people might make stuffed mushrooms to smooze their guests into placing a large order of drills, I make them for my lunch on a boring rainy Saturday. (But if you are the kind of person who throws dinner parties then three mushrooms per person and a basket of crusty bread and you won’t be able to stop your guests buying drills. Providing there are no house elf related catastrophes. And now I think the Harry Potter reference has run its course).

A quick google told me that the most popular fillings for mushrooms include bacon (which I don’t like), goats cheese (which I don’t like) or cream cheese (which I didn’t have). So I improvised with the contents of my fridge and came up with one of the best things I have ever made. Seriously. These could even stand up next to the salted caramel cheesecake of dreams.

  
I guess the point of publishing these recipes is partly so you can learn from my experiences. And the main thing I’ll take away from this? Don’t try and stuff closed cup mushrooms unless you really have no other choice. Hollowing out a mushroom is not an easy task and is a waste of a Saturday afternoon. Even when you can do it while singing along to Taylor Swift. Just buy chestnut mushrooms.

Oh and if you are Aunt Petunia-ing it and making them as a starter they have the added bonus of the option to make the filling ahead. Just get as far as step seven, then leave the filling to cool and add an extra couple of minutes to the oven timings to get that cheese bubbling and delicious.

Makes enough for two as a starter or one as a very fancy lunch.

Ingredients

1 tbsp cooking oil

Knob of butter

½ onion

½ red pepper

½ green pepper

1 clove of garlic

1 red chilli

1 tsp oregano or mixed dried herbs

Salt and pepper

6 medium sized mushrooms

50g grated cheese

2 tbsp breadcrumbs

1 tsp olive oil


Method

  1. Preheat the oven to 160°C
  2. Finely chop the onions and peppers
  3. Heat the cooking oil and butter in a frying pan over a medium/low heat
  4. Once hot add the onions and peppers and fry for about 8 minutes, stirring often, until the onion is softened and just started to brown
  5. Finely chop the garlic and red chilli
  6. Once the onions and peppers are done, reduce the heat to low and add the garlic, chilli, herbs and seasoning and cook for two minutes.
  7. Turn the heat off the frying pan (at this point you can just leave the filling to cool and just heat in the oven later or carry straight on to the next step)
  8. Remove the stems from the mushrooms and put them in an oven roasting dish, top side down
  9. Grate the cheese and stir into the vegetable filling, then use a teaspoon to fill the mushrooms with this mixture
  10. Sprinkle the breadcrumbs over the tops of the mushrooms, drizzle with olive oil and put in the centre of the oven for 10 minutes, until the breadcrumbs are golden and the cheese is bubbling

Recipe: Sweet and Salty Rocky Road

I’m going to begin this post by posing a deep and philosophical question – what is the difference between tiffin and rocky road?

Is it something to do with the amount of chocolate? Or whether it has marshmallows in it? Or just the Americanised name versus the British name? The whole of the internet has failed to give me an answer, maybe one of you can?

Either way this started out in my head as a tiffin but the finished product just felt more like rocky road.

Rocky Road Recipe Chocolate Peanuts Blog Marshmallow

But the one addition that makes this less like every other rocky road you’ve ever tried is the salted peanuts. Although I can’t really claim credit for this brainwave as I didn’t have any other choice – I wanted nuts in it, I didn’t want to pay more than £1, salted peanuts were my only option. But as they say, necessity is the mother of invention. And oh my god is this a good invention.

Now that the world has embraced salted caramel I think I’m just going to be putting salt in every sweet thing I make from now on. Because it just makes it better. And the saltiness cuts through the sweetness in a way that makes eating five in one sitting not only possible but likely.

Salted peanut rocky road with a cup of tea and The Jane Austen Book Club

Another thing in its favour is that it’s incredibly easy to make. The whole thing from beginning to end took me less than half an hour (minus the four hours it has to sit on the side and set while you ignore that little devil on your shoulder telling you to just grab a spoon and dig in now). And that half an hour included the time it took me to cut large marshmallows into mini marshmallows because it saved me £1 and, hello, cheapskate, party of one.

My stingyness is also the reason there aren’t any raisins in this because raisins it turns out are expensive! But I’m sure they’d be delicious. Actually there’s any number of things that could be added to this recipe and would only make it more incredible – almonds, hazelnuts, cranberries, honeycomb, fudge, crystallised ginger, pistachios, apricots, popcorn……. I could go on and on and on and on. But let’s just get to the recipe instead.

IMG_0701

Makes 21 pieces

Ingredients

200g milk chocolate (broken into pieces)

100g dark chocolate (broken into pieces)

125g butter

3 tablespoons honey

150g digestive biscuits

200g mini marshmallows

150g salted peanuts

Method

Line a 30cm by 20cm baking tray with greaseproof paper.

Melt the chocolate, butter and honey over a low heat, then put to one side.

Put the biscuits in a freezer bag and bash with a rolling pin until you have a mixture of crumbs and bigger chunks.

Add the biscuit pieces, marshmallows and peanuts to the chocolate and mix until evenly coated.

Pour into the baking tray and spread into the corners and until reasonably flat on top.

Cover with cling film and leave in the fridge to set for at least 4 hours, preferably over night.

Using a sharp knife cut into 21 even pieces and try to resist the temptation to eat them all in one go.

Salted peanut and marshmallow rocky road

Recipe: Sweet potato curry

This recipe is an absolutely godsend for lazy winter evenings. It’s warming, cheap and you can chuck it all in a pot and forget about it for an hour to return to something truly amazing. Sticky and sweet and comforting and filling.

This is an adapted version of a recipe from Sam Stern’s Student Cookbook. One that we ate so much at university that the page in the recipe book is completely destroyed from the amount we had it open, exposed to splashes and burns. You can just about make out the list of ingredients but the method is beyond help. So before I forget it completely I thought I ought to chronicle it here.

I have adapted to recipe to suit the things I can buy in my local Sainsbury’s. A shop which stocks four different kinds of baked beans but no chickpeas. Any manner of fresh herbs but no spinach. And nothing in the way of curry paste, coconut milk or almonds. But all of those things would make delicious additions.

And as with all Indian meals you’ve got the wonderful choice of naan bread, chapattis, rice or poppadoms to enjoy it with or you could add potatoes to the curry itself. I tried to make my own chapattis which wasn’t an unqualified success and I won’t be including the recipe.

Serves two, takes an hour.

Ingredients

1 onion

1 clove of garlic

Cooking oil

Thumb size piece of ginger

1 large sweet potato

1 large carrot

250ml korma curry sauce

1-2 tbsp mango chutney (depending how much sweetness you like)

1 tbsp tomato puree

250ml chicken or vegetable stock

1 large bunch of fresh coriander, chopped.

Method

Heat the oil in a large saucepan over a medium heat. Cut the onion into small pieces, finely chop the garlic clove and once hot add to the pan and cook until the onion softens.

Finely chop the ginger and add to the saucepan.

Peel and chop the sweet potato and carrot into even sized chunks and add to the saucepan to lightly fry for five minutes.

Add the curry sauce, mango chutney, tomato puree, 200ml of the stock and half the chopped coriander. Stir to combine and leave to simmer without a lid for 45 minutes, stirring occasionally so it doesn’t stick. If it starts to dry out add the remaining stock.

Serve with the naan, poppadoms, chapattis or rice, sprinkled with the remaining coriander.

Sweetcorn fritters and fennel seed coleslaw

IMG_8432

IMG_8433

I had it in my head that sweetcorn fritters were a deep south of America kind of thing that should be eaten while drinking iced tea, listening to blues and saying ‘y’all’ in a cringy attempt at an southern accent. But I spent a month in America and came across these nowhere. Which was a bit of a disappointment but hasn’t stopped me loving them.

The coleslaw I pretty much made up to satisfy a craving for red cabbage (I know, really weird) with random stuff I had in the cupboard. But unlike so many of my more experimental recipes it actually makes a delicious combination.

The fritters and coleslaw on their own are just the right size for a lunch or light dinner but add some fried chicken and you’ve got a proper meal. I just don’t really cook meat for myself very often.

Serves 2 (2 fritters each)

Ingredients for the fritters

1 small onion

1 clove garlic

2 tablespoon cooking oil

2 eggs

4 tablespoons milk

75g self-raising flour

184g tin sweetcorn

Salt and pepper

Hot sauce to serve

Ingredients for the coleslaw

Half a small red cabbage

Two carrots

Small bunch of parsley

1 teaspoon fennel seeds

1 tablespoon olive oil

1 teaspoon honey

Splash balsamic vinegar

Method

Finely chop the onion and garlic and fry until soft with 1 tablespoon of the cooking oil. Remove from the heat.

Beat the eggs, milk and flour into a smooth batter. Mix in the sweetcorn, onions, garlic and seasoning.

Preheat the oven to 50°C.

Heat a small amount of oil in a frying pan over a medium heat and once the oil is hot add a ladle of batter. Cook for about 3 minutes on each side until lightly browned. Remove from the pan, wrap in foil and put in the oven to keep warm. Repeat until you run out of batter.

While the fritters are frying make the coleslaw. Peel the carrot and then use the vegetable peeler to make thin ribbons.

Finely slice the red cabbage, chop the parsley and mix together with the carrot, fennel seeds, olive oil, honey and vinegar.

Serve with hot sauce, iced tea and a Creedance Clearwater Revival CD, preferably on a ranch in Louisiana.

Recipe: Salted caramel cheesecake

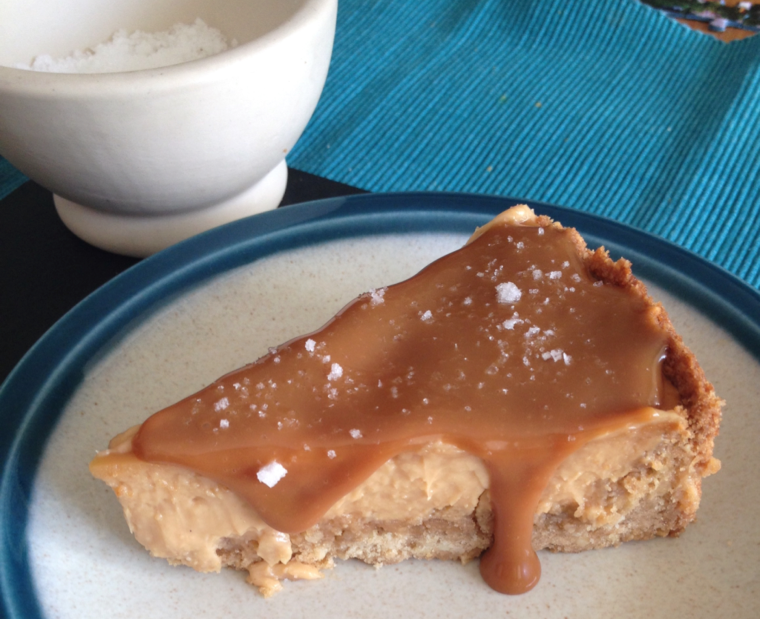
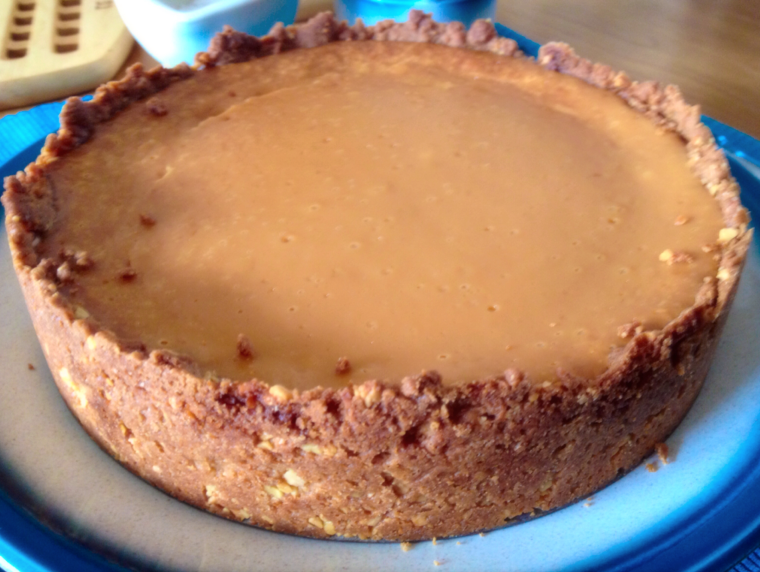
CheesecakeCheesecake 2

To be honest I’m not a big fan of salted caramel or cheesecake but my mum is of both so selflessly I picked out this to make for desert last Sunday. But turns out it was absolutely an unselfish thing to do because it was heartstoppingly delicious. Like seriously, it has to be tasted to be believed.

And not only that but it looked good! Usually things I make either look good and taste horrendous, or look like something you’d find in a patisserie window in France but taste like something you’d find down a drain. But look at the beautifulness of that picture at the top. That perfect drizzle of caramel – nothing I’ve made has ever looked so Instagram-worthy before.

Anyway, enough self-congratulating. What about the recipe? Baked cheesecakes always strike me as being quite tricky to get right but this one was surprisingly easy. Especially as I used bought caramel rather than made it. I used Nestle Carnation caramel which is next to the condensed milk in the supermarket (this isn’t self-explanatory so I thought I ought to tell you) and it was really good without being overly sweet. So I’d definitely recommend buying it rather than attempting to make it yourself. Although you might be amazing at caramel – personally I usually end up having to throw the saucepan away.

It’s important to use full fat cream cheese. The light stuff is too runny and your filling won’t set. But really, it would be ridiculous to try and make this healthier. When something has caramel in the title it’s time to give up counting calories and just enjoy.

Ingredients

For the base:

100g almonds

100g butter

75g muscavado sugar

150g flour

For the filling:

260g cream cheese

40g caster sugar

1 tsp vanilla extract

1 egg

1 egg yolk

1/2 379g tin caramel

For the topping

1/2 379g tin caramel

2 tsp sea salt flakes

Method

Preheat the oven to 160C.

Grease a 20cm loose bottomed tin.

In an electric mixer chop the almonds until somewhere between chopped and ground and remove to a bowl.

Put the butter and sugar in the mixer and cream together.

Add the flour and mix until it forms a dough.

Mix in the nuts.

Tip into the tin and use your hands to press into the corners and up the sides.

Use a fork to poke holes in the base.

Bake in the oven for 16 minutes.

Remove from the oven and put a baking dish full of water in the bottom instead (and you’ll be leaving it in there while you bake the cheesecake).

Beat the cream cheese, sugar, vanilla and half tin of caramel together until combined but don’t overmix it or it will go too runny.

Whisk the egg and egg yolk together and add to the cream cheese. Mix until incorporated.

Pour into the case and bake in the centre of the oven for an hour.

Check that it’s done by shaking the tin, if it wobbles in the middle rather than sloshes then it’s ready.

Turn the oven off but leave the cheesecake in to cool with the door cracked open.

Once it’s cool, pour over the other half of caramel sauce and sprinkle with the salt flakes. Then serve and enjoy.

Recipe: Sweet potato and butternut squash filo pie

Imagine for a moment that you are the kind of person who on a summer’s day gets up early, cooks a variety of incredibly fancy food, packs it into a traditional wicker hamper and takes your family out for a picnic. It’s probably eaten sat on a checked blanket. Off proper crockery. And fed to children with names like Caspian and Seraphina. And alongside your smoked salmon and cream cheese sandwiches and homemade scotch eggs this pie would not look out of place.

I say this but I cooked it in my greasy, hasn’t-been-properly-clean-since-we-moved-in, always-has-a-pile-of-dirty-washing­-up-next-to-the-sink kitchen and then ate off my lap in front of the telly. And the day after I ate chicken nuggets, chips and spaghetti hoops for dinner. So it may look, sound and taste fancy but it’s deceptively easy.

A note on feta cheese; do not go all cheap-skate when you’re in the supermarket and buy innocuous ‘Greek salad cheese.’ It is not the same. For one thing it doesn’t melt so you just end up with lumps of it in your mash and secondly I think it might actually have been halloumi. So go crazy and splash out that extra 50p on the good stuff, it is worth it.

Insisting that you use precisely 400g each of sweet potato and butternut squash is a little impractical. They do not come in nice easy sizes like that. So what I suggest you do is buy more than you need, cook and mash it all and then freeze what you don’t want today for another time. It freezes really well and can be defrosted in the microwave in ten minutes (depending on how large a quantity you have of course).

Serves 4, takes just under an hour, makes a medium amount of washing up (my highest priority when I’m cooking is minimising washing up).


Ingredients

400g butternut squash

400g sweet potato

1 tbsp cooking oil

1 clove garlic

100g pine nuts

Salt and pepper

2 tsp oregano

150g feta cheese

12 sheets filo pastry

1 tbsp olive oil


Method

Peel and chop the sweet potato and peel, chop and core the butternut squash, cutting both into 2cm cubes.

Boil in pan of salted water for 25 minutes.

Preheat the oven to 180C.

Finely chop the garlic.

Heat the cooking oil in a frying pan and add the garlic and pine nuts. Toast for 5 minutes.

When soft, drain and mash the sweet potato and butternut squash.

Crumble the feta into the mash, mix in the pine nuts and garlic and season with the salt, pepper and 1 tsp of the oregano.

Spread 4 sheets of the filo pastry on the base of an oven proof dish so that they overlap each other. Brush with the olive oil and season with salt, pepper and a light sprinkling of oregano. Repeat with a second and third layer of 4 filo sheets (don’t worry if they tear, it’s almost impossible for them not to).

Dollop the mash into the middle of the filo sheets and then gather up the edges of the pastry and fold them over the top.

Cook in the oven for 20 minutes until the pastry is golden and crispy.

Serve with a green salad.

Recipe: Freeze-ahead mixed bean burrito

gfh

I am about as far from being a morning person as anyone you will ever meet. It’s not that I don’t function in the mornings, I just can’t wake up. So I like to set my alarm as late as physically possible. If I have to be out the house at 8.30 my alarm goes off at 8.15. And obviously this leaves me very little time to make my lunch in the mornings.

Enter the freeze-ahead mixed bean burrito.

These are seriously a god sent when I’m working. Just get one out the freezer the night before, zap it for two minutes in the microwave at lunchtime and you’ve got a plate of cheesy nutritious deliciousness. And not only are they easy and healthy but they’re also pretty cheap. And flexible. You can add whatever you fancy – courgette, tinned tomatoes, chilli powder, replace the rice with quinoa – the world is your oyster.

The trickiest part is actually wrapping the burritos. The bigger the tortilla the easier apparently. I watched numerous YouTube videos on how to professionally wrap a burrito (I know, I know, what is my life) and the consensus seems to be don’t overfill. You see that picture at the top? Less than that. That one did not end well.

Makes 8 

Ingredients

80g brown rice

1 tbsp cooking oil

2 onions

1 large clove of garlic

1 tbsp cumin powder

1 tin red kidney beans

2 tins sweetcorn

1 tin mixed beans

150g grated cheese

8 large tortillas

Method

Put the rice and a pinch of salt in a large pan of boiling water and cook for 30 minutes or according to pack instructions.

Chop up the onion and garlic and fry in a saucepan with the tablespoon of oil until softened.

Add the cumin to the onions and continue to fry until lightly browned.

Drain the tins of beans and add to the onions for another five minutes cooking.

When the rice is done mix in with the onions and beans and leave to cool.

Heat the tortillas in the microwave for 30 seconds.

Spread a spoonful of the bean and rice mixture onto the tortilla, top with a handful of grated cheese and roll up in foil.

These can be stored in the freezer for up to 1 month. When you’re ready to eat one take it out the freezer the night before and leave to thaw in the fridge then heat for two minutes in the microwave.

Recipe: Chocolate chip blondies with a peanut butter swirl

Blondies

If you don’t know what blondies are then you are missing out. They’re like white chocolate brownies but better. White chocolate brownies with chewy oats and the out of this world deliciousness of condensed milk. And then as if that wasn’t delicious enough I’ve gone and added peanut butter!

I made these as a birthday present for a friend but quite a few of them may have gone missing before she received them. But I just had to check they were up to scratch. I wouldn’t want to be giving away substandard baked goods. And these were so not substandard that I then had to eat another one. Just cos.

Makes 15

Ingredients

150g softened unsalted butter

125g light muscovado sugar

379g can condensed milk

175g porridge oats

100g plain flour

1/2 tsp bicaronate of soda

1 egg

150g milk chocolate chips

2 tbsp smooth peanut butter

Method

Preheat the oven to 180C and line a 20cm x 30cm tin.

Cream together the butter and sugar until lightly whipped then beat in the condensed milk.

Add the oats, flour and bicarb and beat until smooth.

Add the egg and beat well.

Fold in the chocolate chips.

Put this really thick batter into the lined tin and spread into the corners.

Dollop the peanut butter in about six little splodges across the top and using a spatula swirl into the mixture.

The level the top and put in the oven for 25 to 30 minutes (it goes quite dark on the top and will still feel too spongy underneath but it firms up as it cools).

Leave to cool in the tin and then carefully move onto a board to cut into 15 pieces.

Recipe: Salted Ginger Fudge

FullSizeRender (2)

This really would have been a better recipe to post around Christmas time. Fudge is an ideal present and the ginger and mixed spice in this give it a proper Christmassy flavour. But once you’ve tried it you won’t want to limit yourself to only eating it for one month a year either.

The great thing about fudge is that it keeps for aaaaagggggeeees. Ok, maybe that’s exaggerating. It keeps for two months. But compared to most baked things that really is ages. And as we’re only a small family it can be a bit of a struggle to get through a whole cake or batch of biscuits before they start to go stale (I’m not saying we don’t do it – I wouldn’t dream of letting a cake go to waste – but I’m often left uncomfortably full after) so something like fudge which you can make and eat at your own pace is much more convenient.

The day you’re going to make this don’t bother going to the gym. Making fudge is HARD WORD. You basically have to stir continuously over a very hot saucepan for half an hour. But I suppose it’s good that it’s hard work because have you seen the list of ingredients?!? Huge amounts of sugar AND huge amounts of butter AND condensed milk AND golden syrup. But that’s what makes it so very very delicious.

Don’t worry if you don’t have a sugar thermometer. I’ve made this several times without one, you just have to blag it a bit. For judging when soft ball stage has been reached and it’s time to remove the fudge from the heat I followed these instructions and it’s always worked for me. Just make sure to have a glass of iced water ready beside the saucepan before you turn the heat on.

A good tip for getting the pan clean afterwards is to fill it with boiling water and leave it to simmer for ten minutes or so. This cleans off all the sugar that gets stuck to the outside. Also, I believe it’s best not to use a non-stick pan for fudge but I don’t know where I heard that or who told me so feel free to ignore it and tell me how you get on.

Ingredients

100g stem ginger

250g butter

1 x 379g can condensed milk

120g muscovado sugar

500g demerara sugar

2 tbsp golden syrup

175ml milk

Pinch of salt

4 tsp ground ginger

1 tsp mixed spice

Method

Line a 30cm x 30cm tin with greaseproof paper.

Chop the ginger into small pieces.

Put the butter, condensed milk, sugars, golden syrup and milk into a saucepan and bring to the boil, stirring continuously.

Simmer, stirring continuously, until it reaches 116°C or ‘soft ball stage’ which takes about 15 minutes.

Remove the pan from the heat and let sit for 5 minutes while it cools slightly.

Add the salt, ground ginger and mixed spice and beat vigorously (or as vigorously as you can, you’re going to have to keep this up for about 10 minutes).

When it’s started to noticeably thicken add the chopped ginger.

Continue stirring until it cools to 60°C at which point it will be the consistency of peanut butter and getting too stiff to stir.

Scrape the fudge into the lined tin and flatten out as best as you can.

Chill in the fridge for 2 hours then remove and leave it to set at room temperature overnight.

Remove from the tin and cut into squares using a sharp knife.

Recipe: My go to dinner

IMG_6903

You know those meals that just taste unhealthy? This is one of them. But the magical part is that it’s not. At all. Unless you call one tablespoon of oil and a pinch of salt unhealthy in which case – what on earth DO you eat?

Not only is this meal healthy, it’s also easy, cheap and delicious. Sound too good to be true? Ok, I admit it is a little. The pay off is that it’s not particularly quick to cook. It takes about half an hour and you do need to be in kitchen all that time. But you can do something else at the same time easily enough; it just needs stirring every now and then.

Whenever I’m cooking just for me this is my go to recipe. I would happily eat it twice a week. I can’t explain why it’s so good – it’s only egg fried vegetable rice – but it just works. I think it’s something to do with the saltiness of the rice and the sweetness of the caramelised onion. It might seem excessive to put the vegetables on so early but cooking them for longer over a lower heat is really worth it.

You can vary it to your tastes too using pretty much any vegetables you want. Broccoli, baby sweetcorn and pak choi (if you’re feeling fancy) have all been tried, tested and approved. If you want it spicy you could add a red chilli to the veg halfway through cooking. Or a sprinkling of cumin in with the onions works really well. But the recipe I’m giving you is with the most store cupboard basics.

Serves 1

Ingredients

75g brown rice

Pinch of salt

1 brown onion

1 small clove of garlic

1 tbsp cooking oil

1 carrot

Half a red pepper

1 egg

Method

Put the rice in a saucepan of boiling water with a pinch of salt, cover and leave to simmer for half an hour.

Meanwhile, chop up the onion into reasonably small pieces. Crush the garlic.

Heat the oil in a medium frying pan over a low heat.

Add the onion and garlic.

Cut up the carrot and add to the frying pan.

Cut up the red pepper and add.

Continue to stir the vegetables every now and then. If the onion starts to burn rather than caramelise then turn the heat down.

Stir the rice occasionally too, making sure it isn’t sticking and top up with water if it starts to boil dry.

Once the rice has had half an hour check to make sure it’s cooked then turn off.

Beat the egg and add to the frying pan, stirring vigorously until it scrambles.

Drain the rice, mix into the vegetables until everything is coated in the egg and serve.